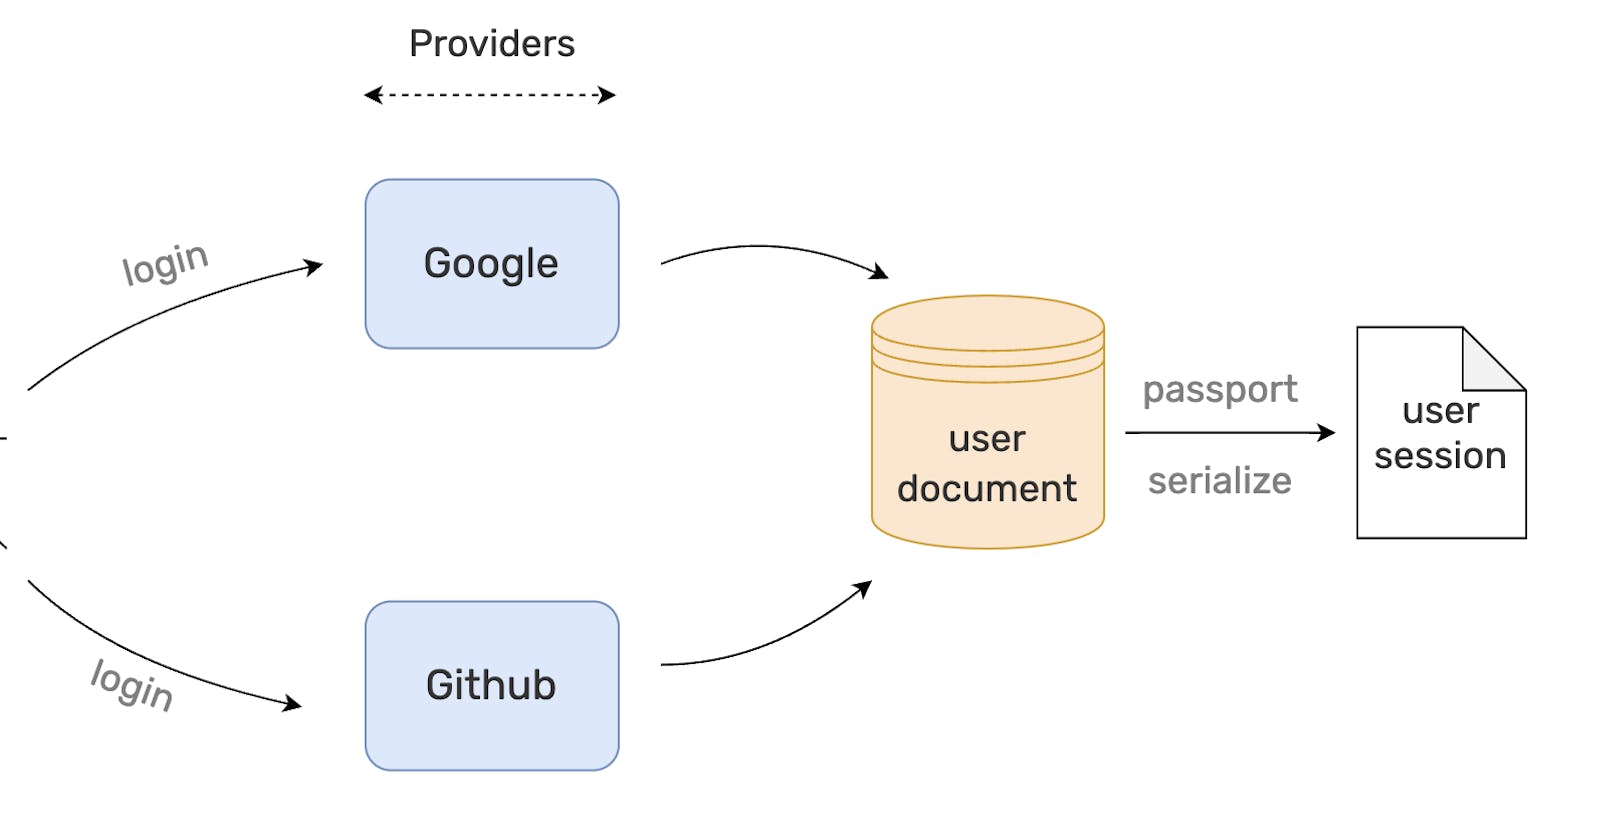
Complete Guide to Multi-Provider OAuth 2 Authorization in Node.js
Includes cross-provider sync and multiple logged in accounts support
Table of contents
- How it is structured
- OAuth 2 Overview
- Create API keys for all providers
- Setting up starter application
- Configure Passportjs
- Adding Google OAuth login
- Authentication milestone achieved 🥁🥁🥁
- Implementing cross-sync for social providers
- Cross-Sync Achieved 🎉🎉🎉
- Adding support for multiple logged-in accounts
- 🎉 We have completed the final step 🎉
- Conclusion
- What next?
- Resources
OAuth 2 authorization makes the user authentication journey very seamless. It enhances the user experience, minimizes the attack surface, and encourages a definite & limited authorization model.
In this guide, we will take a look at how you can build a complete OAuth 2 authorization workflow in a nodejs application using Passportjs. We will be focusing on the back-end in this guide i.e., Nodejs, MongoDB, and Passportjs.
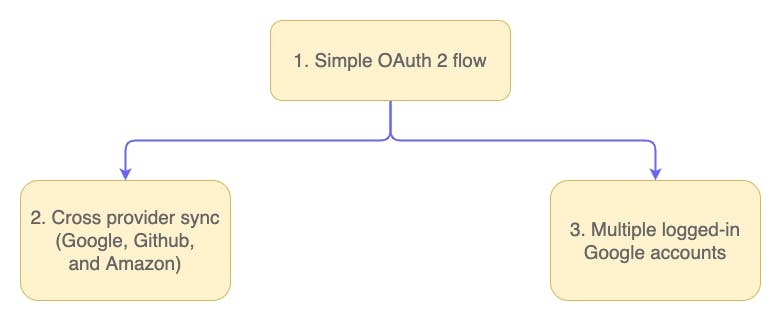
There are three major goals, divided into checkpoints:
With that said, you are expected to have a working node.js application using MongoDB as a database. It won't cover starting a project from scratch.
In case you need a basic application running, you can clone the repository from here.
This guide contains the code snippets, a link to a Github branch, and a demo for each checkpoint. So you can expect to follow along and implement alongside.
How it is structured
This is a step-by-step guide to implementing an OAuth 2 authorization in your nodejs application using multiple providers (Google, Github, Amazon).
It provides the ability to cross-sync multiple social accounts so that you can log in using any one of them.
As a third and final checkpoint, you will learn how to support multiple Google logged-in accounts. This is very similar to what Gmail offers and allows you to switch accounts without having to authenticate every time you switch.
Here’s how it is structured:
- Implementing OAuth 2.0 authorization.
- Adding the ability to cross-sync multiple providers.
- Extending the code to allow adding multiple Google accounts.
This is going to be a comprehensive guide covering the steps as well as troubleshooting the roadblock(s) that come along the way. Feel free to go through different sections to scope things out.
OAuth 2 Overview
If you're starting today, don't use OAuth 1. It had a lot of issues (limit on providers, hard to scale, etc.) and is deprecated now.
OAuth 2 is designed to provide authorization with delegated authentication. OAuth 2 does not provide a user authentication mechanism, by design.
Here's a quick recap on Authentication vs. Authorization:
Authentication makes sure a user is who they're claiming to be.
Whereas Authorization governs what the user has access to.
An OAuth 2 application delegates the authentication to services that host a user account and asks for (limited) authorization from those services, after the user has given consent.
To understand with the help of an example, it is like informing Google (through user consent) that it is okay for Todoist to access your Google profile information and update your Google Calendar on your behalf.
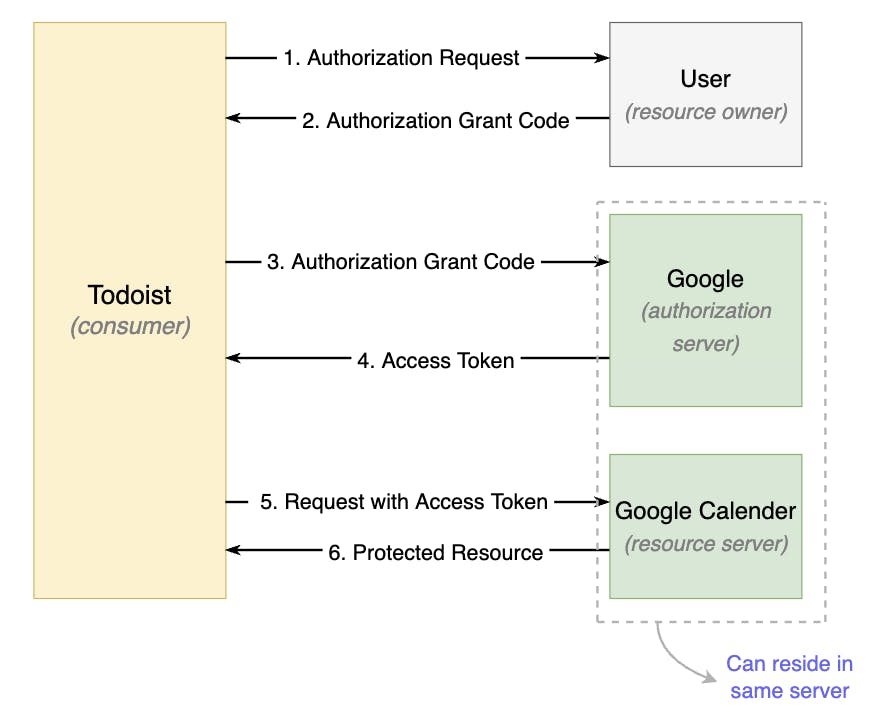
Here is the step-by-step breakdown of how the OAuth 2 authorization flow works:
User wants to use Todoist by signing in to Google.
- Todoist acknowledges the user's request and shows an authorization request (or a consent screen).
- User gives the consent and the consumer (Todoist) receives an authorization code from Google. It is a way to identify which consumer was authorized.
- Consumer then goes to the authorization server (or Google) with the authorization code.
- Authorization server recognizes the valid authorization code and gives an access token to the consumer application.
- Consumer requests access to user resources using the access token.
- The consumer application successfully receives the authorization to access user resources (in this case, Google calendar's read + write access).
The benefit? Todoist never gets to know your Google password. Thus, you're safe in case Todoist suffers a security breach.
We used the authorization code implementation of the OAuth 2. But there are other ways to implement it also.
And yes, there are trade-offs here too. For instance, you would need a separate integration (in the case of Passportjs, a different strategy) for each social provider you plan to support in your application.
I hope this gave you a general overview of how the OAuth 2 authorization works.
The theory's over. Let's move on to the next step 👇🏻.
Create API keys for all providers
Before we start working on our backend API, let’s create the credentials for the providers that we want to support. This will avoid context switches when we get to the implementation.
- Visit the credentials page.
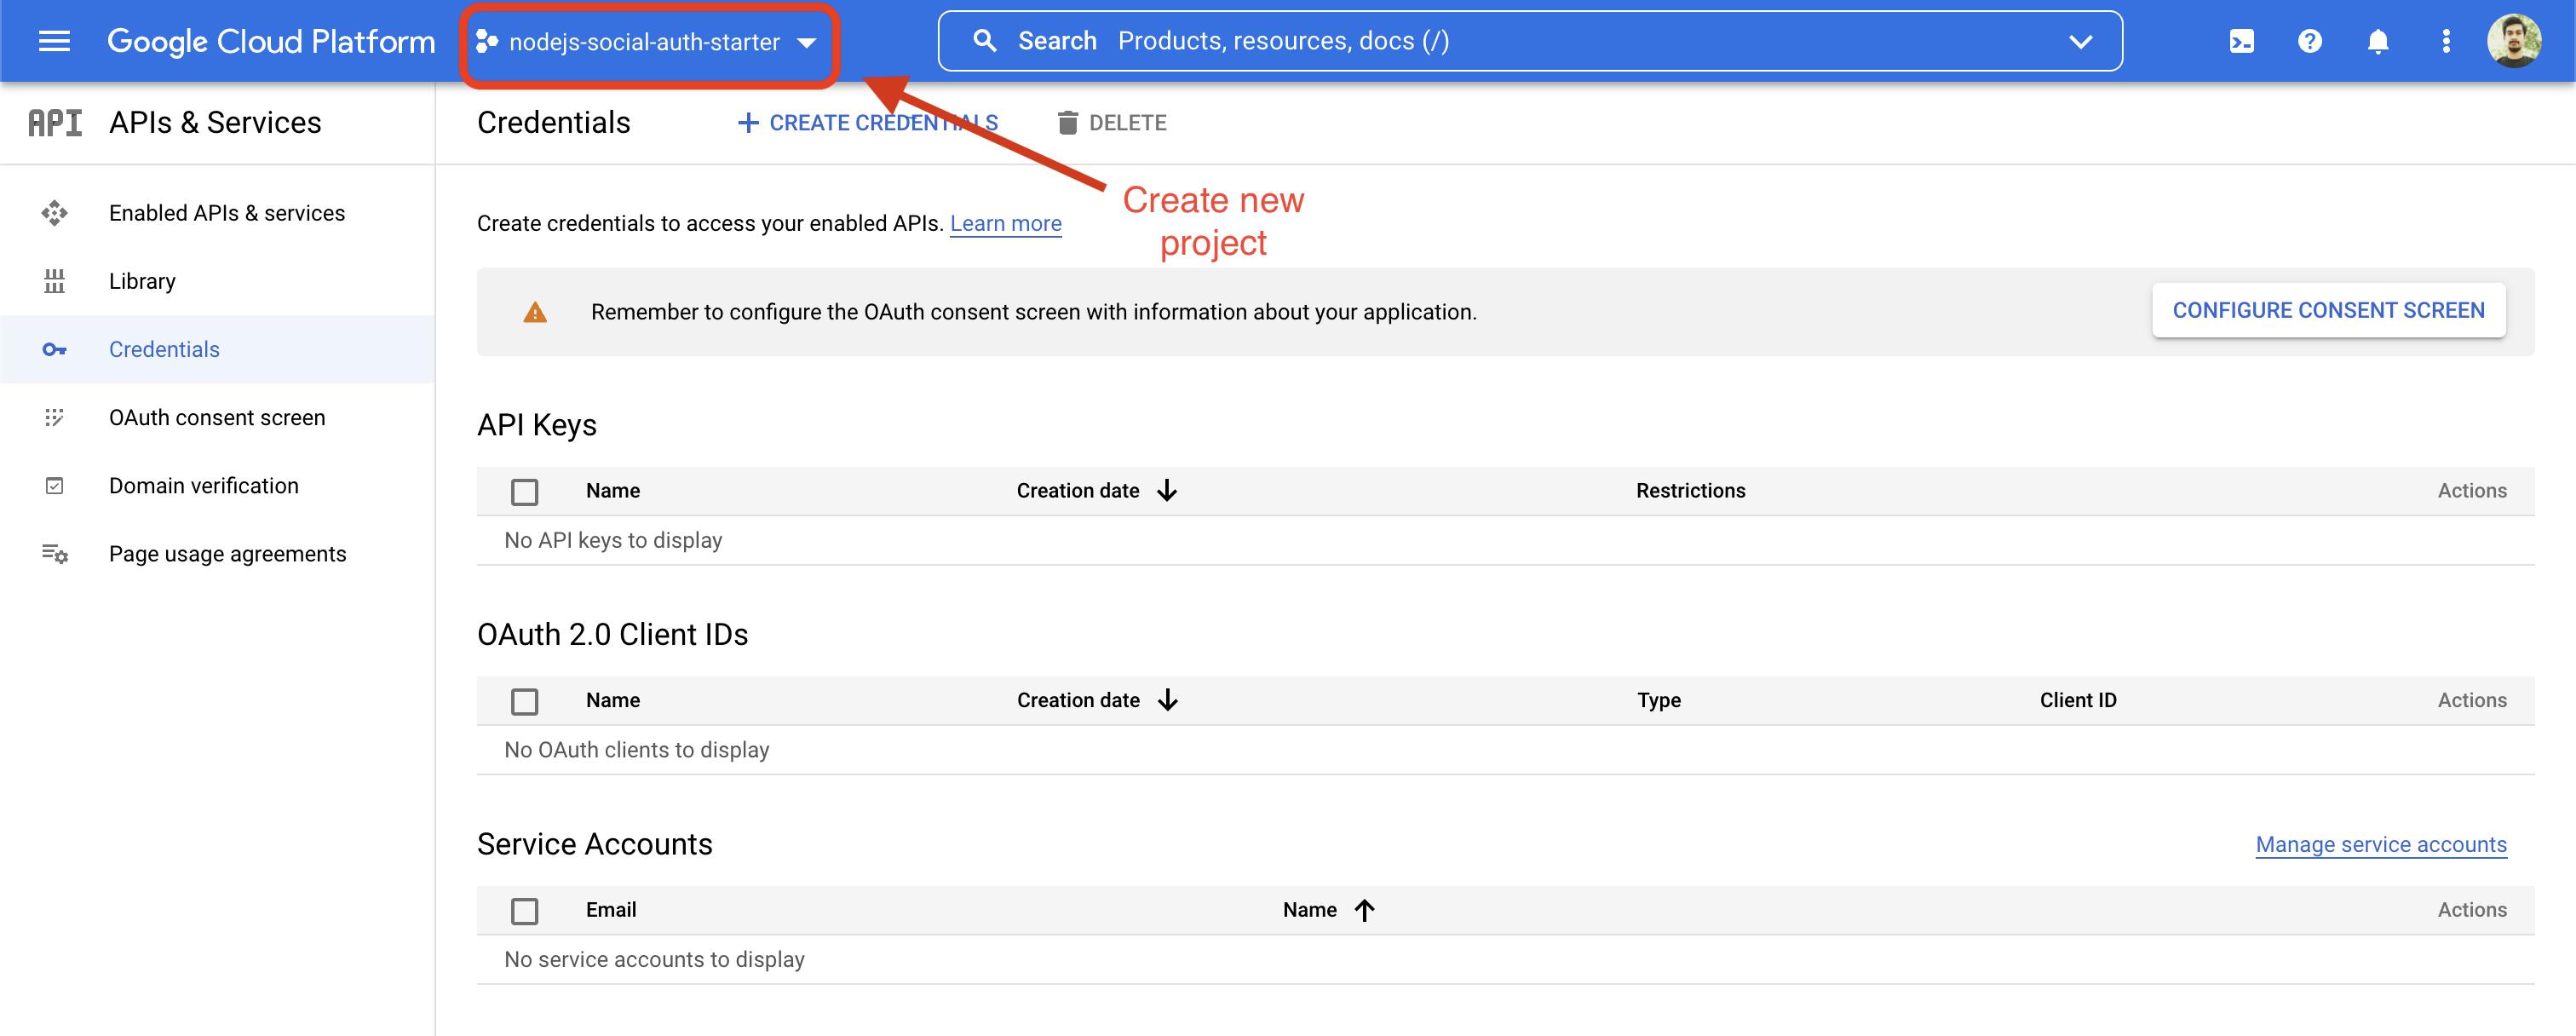
- Use the already selected project or create a new one.
- Visit the Consent screen page and fill in the required details. For our use case, here’s what we will do:
- Select user type to be external (if asked).
- App name can be the same as our project’s name, i.e.,
nodejs-social-auth-starter. - Enter your email in support email and developer contact email inputs.
- Click “save & continue”.
- Next, it asks for scopes. Enter profile and email. Again, save and continue.
- Review everything and proceed.
- Create a new OAuth Client ID.
- Select the application type to be “Web Application”.
- Most importantly, we will fill the “Authorized redirect URIs” to be
http://localhost:3001/api/auth/google/callback.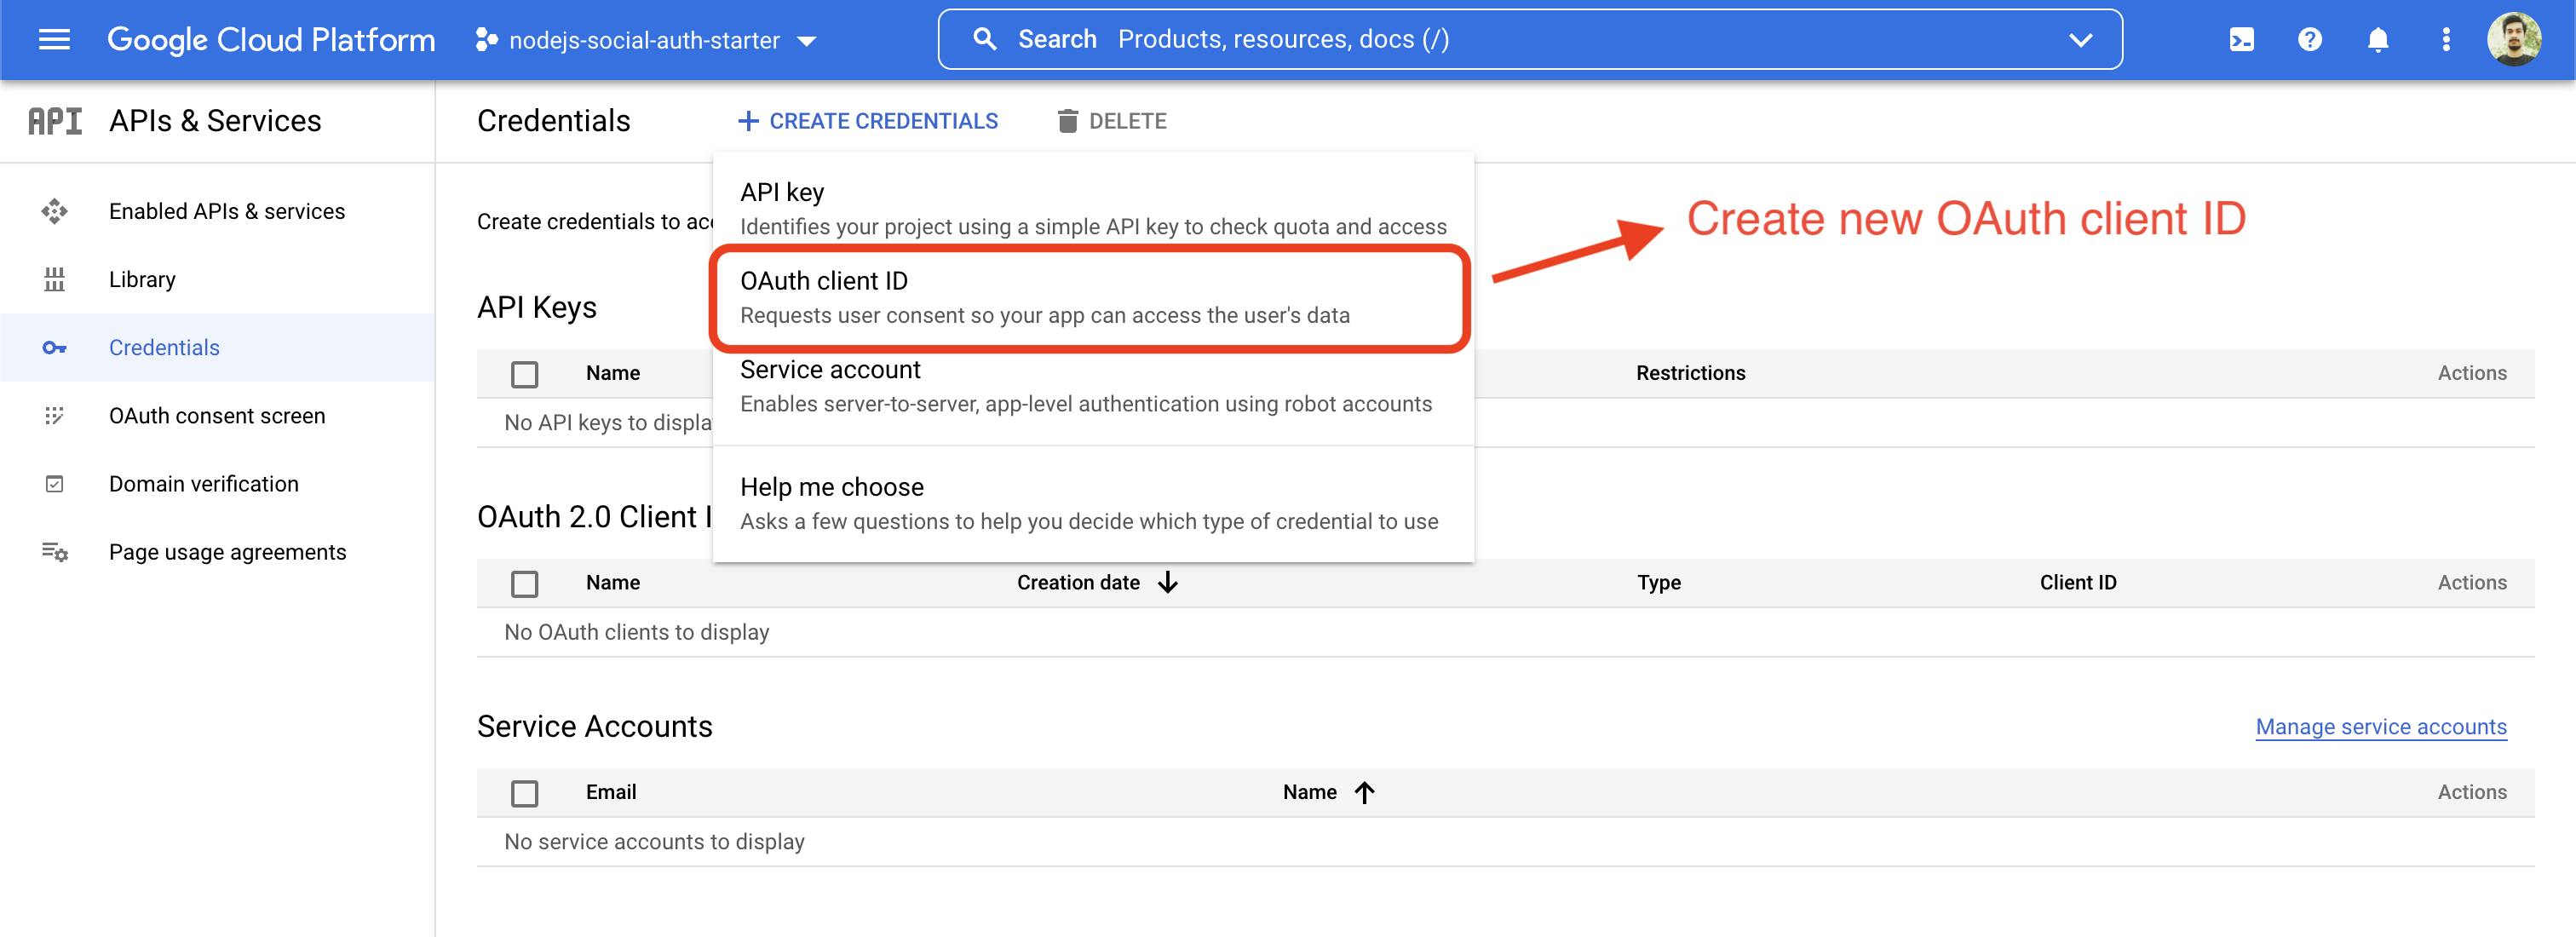
- Save and proceed. You will find the newly created OAuth client ID on the crendentials page.
Github
For Github, head over to your Settings > Developer Settings > OAuth apps and create a new app.

NOTE: You will need to also create the client secret manually after following the above instructions.
Amazon
- Visit Amazon developers console.
- Create a new security profile.
- Note down the OAuth2 credentials in your
.envfile. - Go to your newly created profile's web settings:
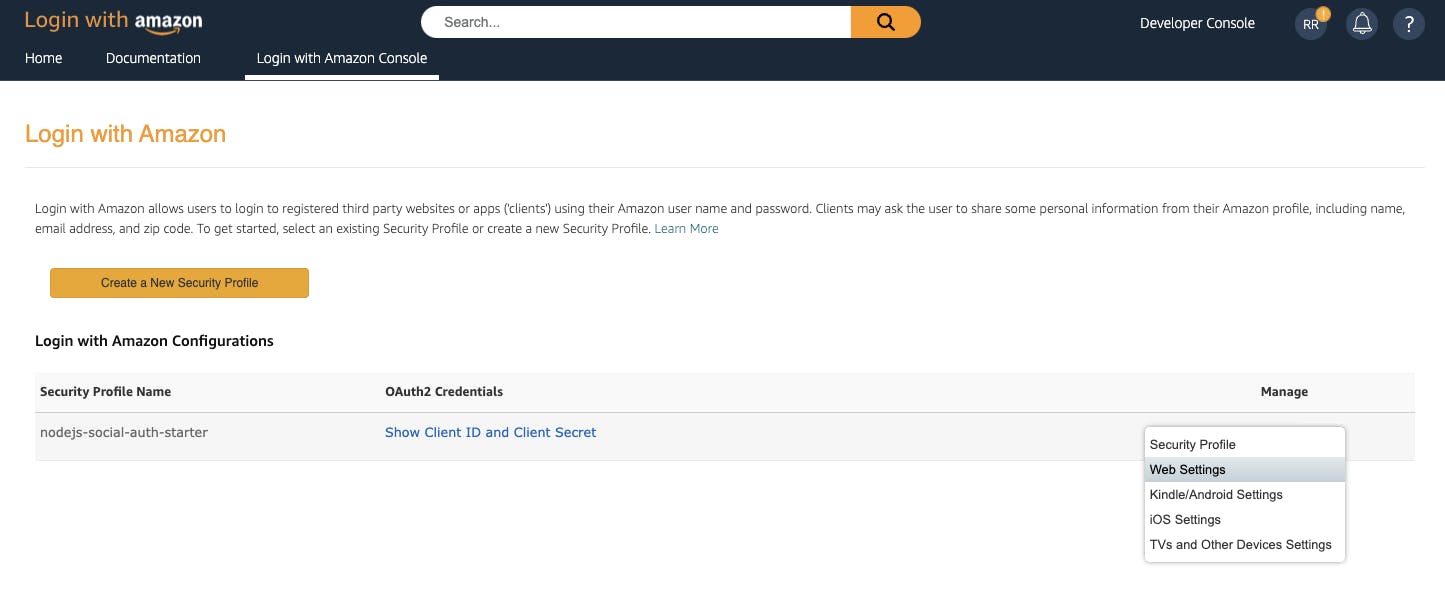
- Fill the
Allowed OriginsandAllowed Return URLsfields.

Setting up starter application
Throughout the article, we will be working with a sample project which can you find here.
We are using Expressjs for the backend server, MongoDB as a storage layer, and Passportjs for implementing the OAuth 2 authentication in our application.
To follow along, make sure to do the following:
Clone the repo:
Install the dependencies using
npm install
That's it! You should be able to run the server by running the command npm start.
There are several branches in the repository:
base: Starter project setup; choose this to start from scratchbasic-oauth: Contains basic passport OAuth implementationmain: Basic OAuth2 + allows cross-sync between providersmultiple-google-accounts: Basic OAuth2 + contains the multiple logged-in Google accounts feature
You can choose to start from scratch (basic express server setup). Feel free to check out different branches to see different states of the code.
To make it easier to follow along, the base branch contains the commented out changes of basic-oauth branch. So you can go through the first section of this guide and progressively uncomment code snippets to see them in action.
User model
Before jumping into the implementation, let's understand the fields in our User schema and why we need them.
NOTE: Only a single MongoDB document can exist for a given email i.e., one email cannot be a part of more than one account.
Here's our User schema:
var mongoose = require('mongoose');
var Schema = mongoose.Schema;

// Schema to store the information about other logged in accounts
const accountSchema = new Schema({
  name: String,
  userId: String,
  email: String
});

// create User Schema
var UserSchema = new Schema({
  name: String,
  connectedSocialAccounts: {
    type: Number,
    default: 1
  },
  otherAccounts: [accountSchema],
  google: {
    accessToken: String,
    email: String,
    profileId: String,
  },
  github: {
    accessToken: String,
    email: String,
    profileId: String,
  },
  amazon: {
    accessToken: String,
    email: String,
    profileId: String,
  }
});

const User = mongoose.model('users', UserSchema);
module.exports = User;
We have dedicated fields for all the social providers to store their access token, profile Id, and email. Additionally, we have two special fields:
otherAccounts: It stores all the other accounts user has logged in from.connectedSocialAccounts: It is a count of providers synced to the logged-in account.
We don't need to worry about these fields for now. We will cover them in great detail in the later section.
Okay, enough theory. Let's start coding 🚀.
Configure Passportjs
Passportjs is authentication middleware for Node.js and it is very modular (has ~500 authentication strategies) and flexible (complete control over how the authentication flow works). Another great thing I liked about Passportjs is that once logged in, it populates the request.user with the user details (provides serialize & deserialize functions for flexibility).
We will work with Google, Amazon, and GitHub APIs in this article. You can go ahead and add more strategies to your application if you like.
To configure Passportjs, we need to set up a session store, initialize Passportjs & its sessions, and use express-session to store the cookie in our session store.
Let's go through them one by one:
Setting up session store
We'll be using connect-mongo as our session storage layer.
npm install connect-mongo
Finished installing? Awesome! Let's set up our mongo session store.
const MongoStore = require('connect-mongo');
const { databaseURL, databaseName } = require('@config');

module.exports = {
  run: () => MongoStore.create({
    mongoUrl: databaseURL,
    dbName: databaseName,
    stringify: false,
    autoRemove: 'interval',
    autoRemoveInterval: 1 // In minutes
  })
};
Finally, make sure to run this loader. In our case, we include this in our main loader file which runs on application startup:
const mongooseLoader = require('./mongoose');
const expressLoader = require('./express');
const passportLoader = require('./passport');
const sessionStore = require('./sessionStore');

module.exports = {
  run: async ({ expressApp }) => {
    const db = await mongooseLoader.run();
    console.log('✌️ DB loaded and connected!');

    const mongoSessionStore = sessionStore.run();

    await expressLoader.run({ app: expressApp, db, mongoSessionStore });
    console.log('✌️ Express loaded');

    passportLoader.run();
  }
}
Install and configure the express-session package
Passportjs is just a middleware for Expressjs applications. Hence it does not have any storage layer to store the user sessions. For that reason, we need to use a separate storage solution for our user sessions.
There are two options:
- Cookie session package - cookie contains all the user session details
- Express session package - cookie only contains the session ID, session data is stored in the backend.
We will go with the second approach as that is more secure.
express-session provides a lot of options for session stores. While the default is a memory store, we’ll be using a mongo store for better security, scalability, and reliability of data.
Why MongoDB for the session store? Because we are already using it for our application data.
Let's install the express-session package first:
npm install express-session
Once installed, we need to configure this in our express server:
app.use(expressSession({
  name: cookieName,
  secret: 'keyboard cat',
  resave: false,
  saveUninitialized: false,
  unset: 'destroy',
  cookie: {
    httpOnly: false,
    maxAge: 300000, // 5 min
  },
  store: mongoSessionStore
}));
Now that we have the sessions middleware in place, we don’t need to care about storing sessions.
The next step is to set up Passportjs and enable sessions 🔑.
Initialise passport and enable passport sessions
Let's quickly install the package first:
npm install passport
Two steps to complete the initial setup:
- Initializing passport and sessions
- Inject serialize and deserialize middleware in our express loader
The first step is a plug & play mechanism to enable Passportjs for our application. And the second step allows us to tell Passportjs what we want to put in the user session and consequently in request.user.
Initializing is quick, just put these lines after the express-session middleware in the express loader:
// Enable passport authentication, session and plug strategies
app.use(passport.initialize());
app.use(passport.session());
That was fast! Here’s the basic serialize & deserialize middleware we’ll put in our express server:
    passport.serializeUser(function(user, done) {
      process.nextTick(function () {
        done(null, user._id);
      });
    });
    passport.deserializeUser(function(id, done) {
      process.nextTick(function () {
        User.findById(id, function(err, user){
            if(!err) done(null, user);
            else done(err, null);
          });
      });
    });
Serialize function tells Passportjs what to store inside the user sessions. Deserialize function attaches the result to the request.user.
Since we want the complete user object to be present in request.user, we find the user document using the userId stored in the session. Alternatively, we can choose to store the complete user object in the session too. That way, we won't have to perform a database query in our deserialize function.
We are going ahead with the above approach because it makes switching accounts easier. This will become more clear when we perform hot reloading of our user sessions in the third section of this guide.
If you're still unclear on serialize and deserialize functions, you can check out this visualization for a better understanding. Worth checking out.
That's it! We're done with the basic Passportjs setup 🎊.
Adding Google OAuth login
Now that we have all project setup and dependencies installed, we are now ready to look at the authentication using Google OAuth.
To set up Google's OAuth2 authentication using Passportjs, we need to follow these steps:
- Create a Passportjs strategy for the provider (eg. Google)
- Add the authentication routes for the provider
- Add a middleware to check for authentication
- Adding the logout functionality
Let's implement Google OAuth2.
Create a passport strategy for Google
We need a passport strategy for every provider we add to our application. A strategy includes our OAuth2 API credentials for the provider, some custom options, and a verify function.
Credentials are given to the applications that are registered at Google's developer console. Verify function is where developers can provide the logic of how they want to identify users, preprocess the data, perform validations and create database entries.
Passportjs also provides documentation for nearly every strategy. We will follow the documentation for Google OAuth2 strategy in this section.
Let’s look at our basic passport strategy for Google:
const passport = require('passport');
const GoogleStrategy = require('passport-google-oauth20').Strategy;

const User = require('@models/user');
const config = require('@config');
const { default: mongoose } = require('mongoose');
const mongoSessionStore = require('../../loaders/sessionStore').run();

passport.use(new GoogleStrategy({
  clientID: config.googleClientId,
  clientSecret: config.googleClientSecret,
  callbackURL: config.googleCallbackUrl,
  scope: ['profile', 'email'],
  passReqToCallback: true,
  },
  async function(req, accessToken, refreshToken, profile, done) {
    try {
      const email = profile['_json']['email'];
      if(!email) return done(new Error('Failed to receive email from Google. Please try again :('));

      const user = await User.findOne({ 'email': email });

      if (user) {
        return done(null, user);
      }
      const newUser = await User.create({
        name: profile.displayName,
        profileId: profile.id,
        email: email,
        accessToken,
      });
      return done(null, newUser);
    } catch (verifyErr) {
      done(verifyErr);
    }
  }
));

module.exports = passport;
We pass two parameters to our Google strategy:
- The options object - it contains credentials, scope, and passReqToCallback setting which makes the request object available in the verify callback function.
- Verify callback function as the second parameter. This is where you can customize the logic based on your needs and build custom logging journeys.
This Google strategy will definitely evolve when we extend the functionality later in the article. But for now, this strategy helps us create new users in the database if they don’t exist. And we return the user object in the callback. Short and sweet.
Where does this callback send the data we pass? To Passport's serialize and then deserialize function. Serialize function attaches the user Id to request.session.passport.user. The deserialize function fetches & stores the user object in request.user.
🚧 [Roadblock] Patching node-oauth to workaround Google APIs
While working on the project, you might experience a roadblock with the Google OAuth2 strategy.
Google API sometimes closes the connection early causing the node-oauth callback to immediately get invoked, which is fine. But when the Google servers perform the connection reset, it goes into the error callback and node-oauth calls the callback again which leads to InternalOAuthError.
This is a known issue and there is a comment in the code highlighting this.
The impact? OAuth flow might not work for Google. But there's a workaround 💡.
You need to make a slight change in the error callback in your node-modules/node-oauth/ package to skip invoking the callback if it is already invoked once.
request.on('error', function(e) {
+    if (callbackCalled) { return }
     callbackCalled = true;
     callback(e);
});
To make sure this patch gets on to the remote repository, you can use the patch-package to modify node-oauth's code.
This was a solid ~4 hours journey for me, I hope this workaround helped you avoid it.
Add authentication routes for Google
Looking at the documentation, we need two routes:
- First starts the authentication flow by redirecting the user to the consent screen.
- Google provides an auth code once the consent has been given by the user. We need the second route to handle that redirection and complete the auth flow.
This is a quick one, we will add these routes to our auth routes module (/api/auth/...):
router
  .route('/google/callback')
  .get(passportGoogle.authenticate('google', { failureRedirect: '/login', successReturnToOrRedirect: '/' }));

router
  .route('/google')
  .get(passportGoogle.authenticate('google'));
NOTE: I prefer the above way of defining routes as it gives the flexibility of attaching multiple controllers for different HTTP verbs for the same exact route.
And we're done with the routes. Time for our authentication check middleware 👇🏻.
Add authentication middleware for protected routes
Passportjs attaches the .isAuthenticated() method to the request object which allows us to conveniently check if the user is logged in.
Here's our middleware:
function ensureAuthenticated(req, res, next) {
  if (req.isAuthenticated()) {
    return next(); // user is logged in
  }
  res.redirect('/login');
}
We can also use
req.userto check for a logged-in user.
Adding the logout functionality
The project's front-end has a logout button but we haven't handled it on the backend yet. To log out a user, we need to expire the user session and the session cookie on the client-side.
Once it is done, we will redirect the user to the login page (/login; handled by our front-end app).
router
  .route('/logout')
  .get(function(req, res, next) {
    req.session.destroy(function(err) {
      if(err) return res.redirect('/');
      res.clearCookie('sid');
      res.redirect('/login');
    });
  });
express-session gives us a method to destroy the session which is an extended version of (req.logout()). While req.logout() only removes the user information from the session, the destroy method deletes the whole session document altogether.
Once the session is deleted, we remove the cookie from the client-side and redirect the user back to the login page.
Users can't access the protected routes (routes behind the authentication check middleware) even if they directly enter the URL in the address bar and hit ENTER.
You can follow the exact same steps to implement OAuth authentication for other providers. Feel free to check out this branch for the implementation for other providers.
Authentication milestone achieved 🥁🥁🥁
Woah! If you're following along, you surely deserve this:

We have supported:
- Login using Google OAuth 2 flow using Passportjs,
- Authentication check middleware to deny accessing protected routes anonymously, and
- Logout functionality
📺 Here's the walkthrough of what we have built till now:
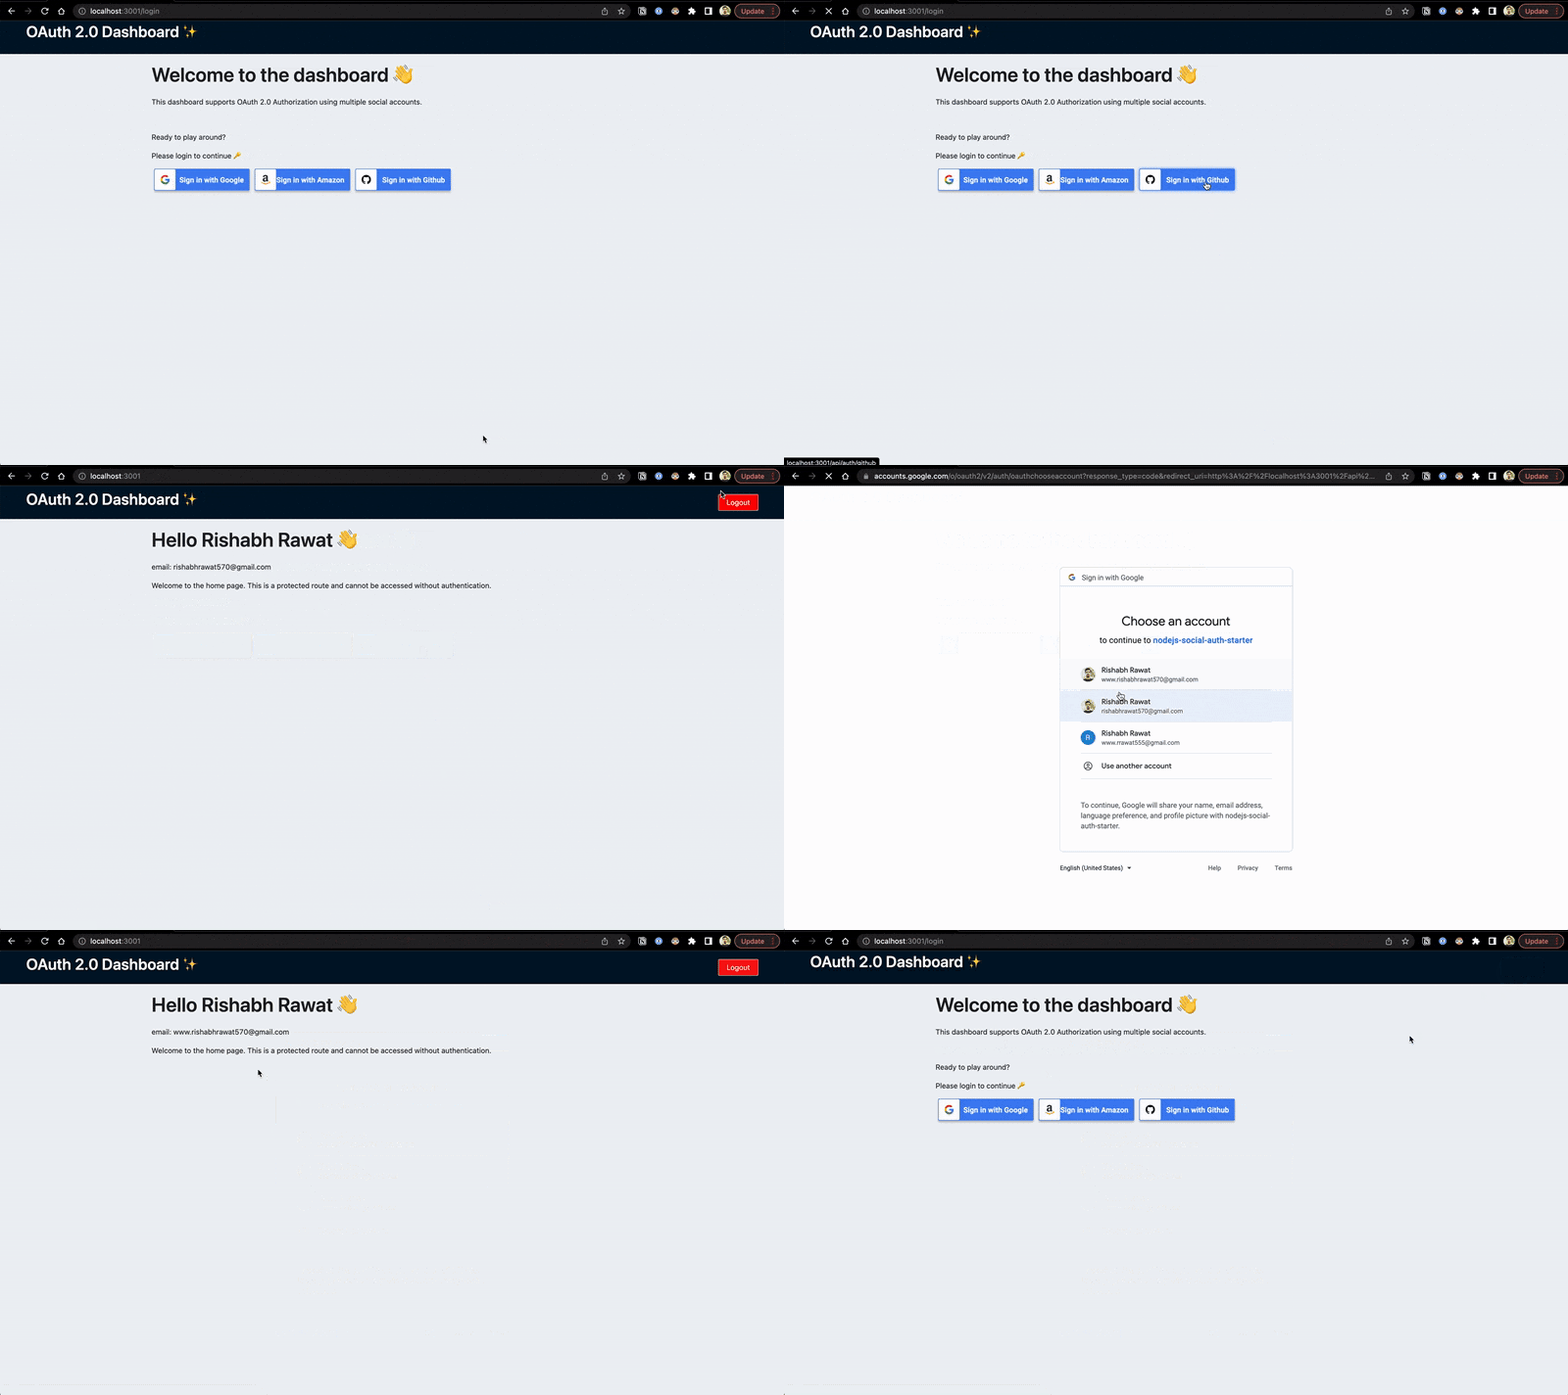
Let's keep the flow going and move on to our next section, which is, adding the ability to cross-sync providers.
Implementing cross-sync for social providers
Welcome to the second section of this guide where you will learn how to implement cross-sync functionality for different social OAuth providers (Google, Github, and Amazon).
Why implement such a feature? TL;DR: Better UX ✨.
There can be several reasons a user might want to have multiple social accounts linked to your website. They might've lost control over one of their social accounts, forgotten their password, or simply don't want to share a specific email address to prevent bloat & spam on that address.
Whatever the reason might be, users always love to have the ability to login into your website using any one of their social accounts (Google, Facebook, Twitter, Instagram, and Github are some examples).
Who uses it? There are a lot of real-world products that use this feature, albeit calling it something else.
Todoist uses it, for instance. If you are a Todoist user, you can find it in your account settings:
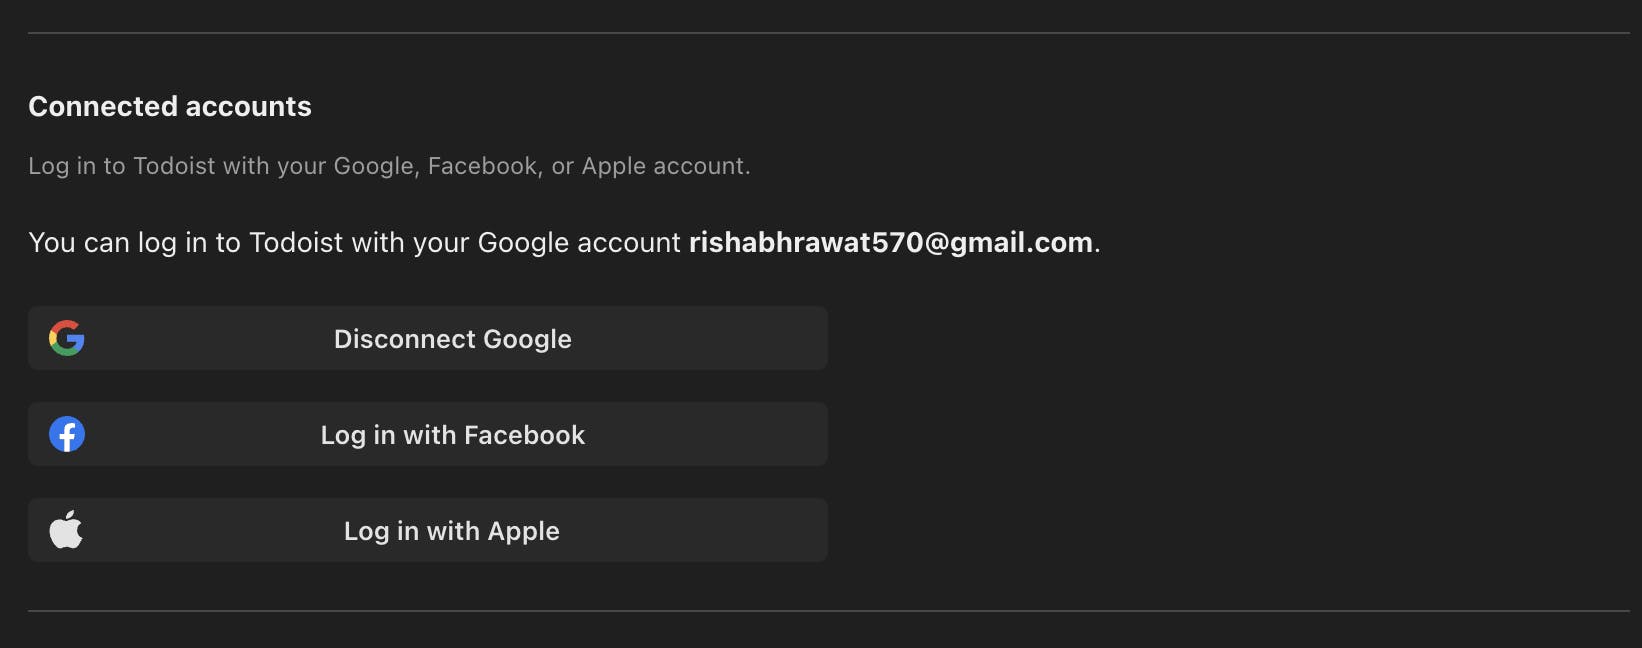
We want to achieve the same thing with our application i,e., to allow users to log in using any one of their connected accounts. If you have connected your Google and Github accounts to the application, you should be able to log in to your account using anyone of them.
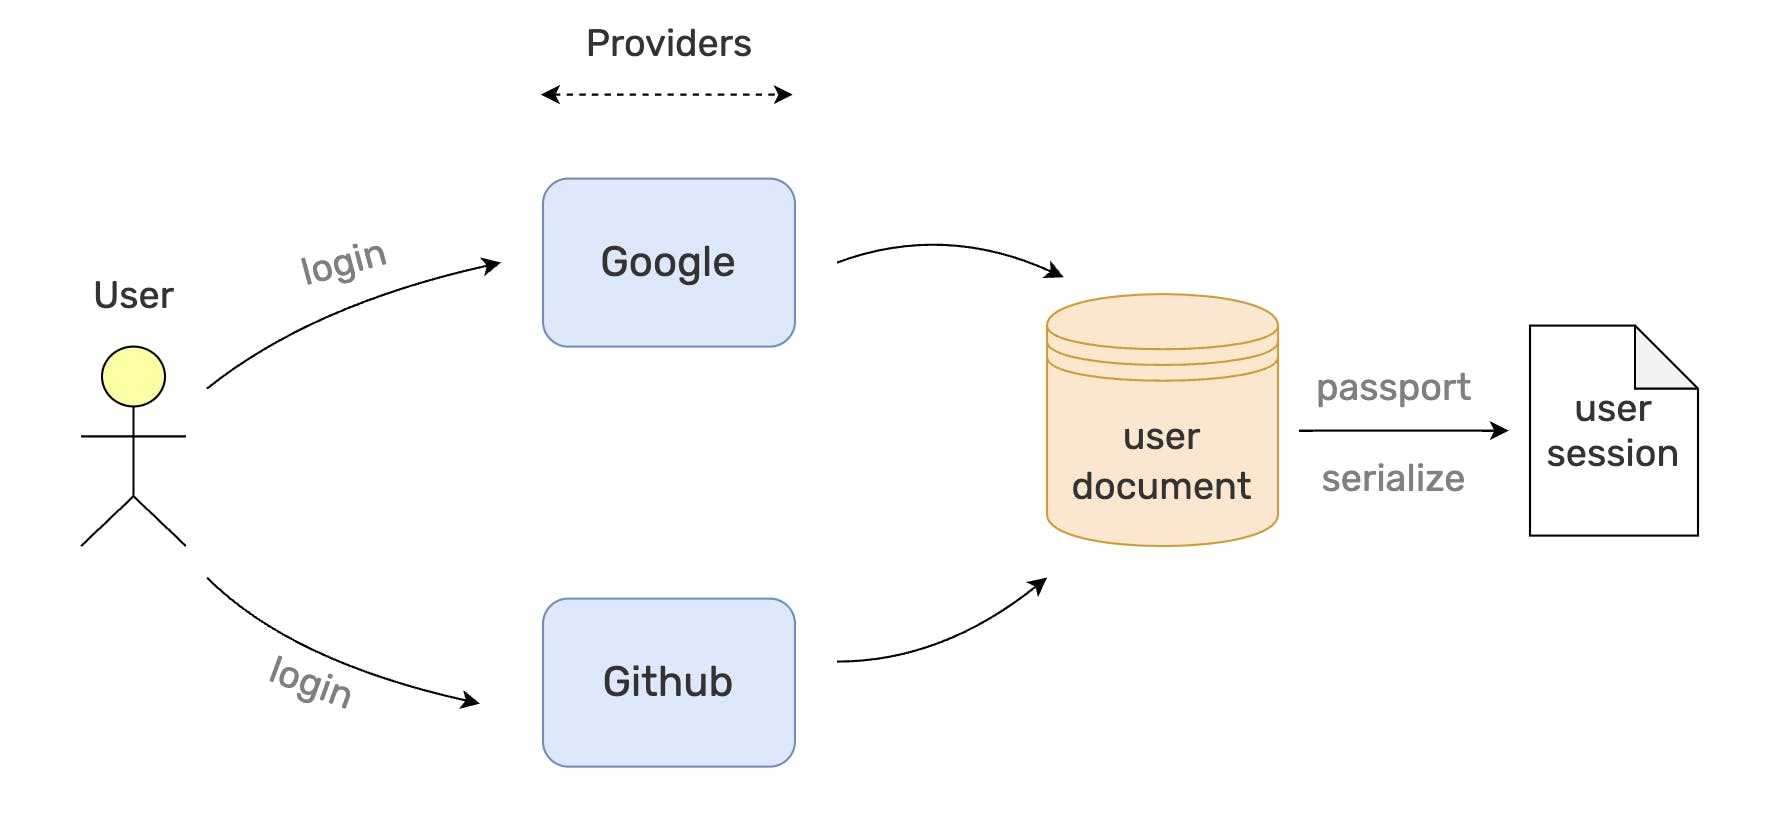
There are four things to keep in mind to implement this:
- How the user will connect/disconnect the providers?
- How to connect different providers to a single user account?
- How to make sure that the user doesn't disconnect all of the connected providers from their account?
- Show the status of connected and disconnected (or yet-to-connect) providers on the UI.
Let's understand and find an answer to these questions 💡.
Routes for connecting and disconnecting providers
We can use the same route for connecting a new provider that we use for Google OAuth login. This is possible because the verify function in Google's passport strategy is flexible (remember from the first section?).
We can tweak the logic inside the verify function based on the requirements. This is such a powerful feature and it also saves one additional route for connecting (or linking) a new provider.
To disconnect or unlink a provider from the user account, we would need a dedicated route. This route will delete all the provider data from the user document in MongoDB.
Let's take a look.
router.get('/google/disconnect', async (req, res) => {
  if(req.user.connectedSocialAccounts > 1) {
    await disconnectGoogle(req.user);
  }
  res.redirect('/');
});
Making the request to /api/auth/google/disconnect invokes our disconnectGoogle handler (in src/services/user/index.js) which removes all the Google-specific data from the user document.
async function disconnectGoogle (user) {
  if (!user || !user.google) return;
  await User.findOneAndUpdate({ _id: user._id }, { $unset: { google: 1 }, $inc: { connectedSocialAccounts: -1} });
}
Linking different providers to a single user account
The first obvious data point is that there must be a logged-in user when a request to link a new provider comes. Otherwise, the request is treated as a login request, not a provider sync request.
We will leverage this piece of information to fine-tune Google's passport strategy and add the support for connecting a new provider.
Let's visualize it with a flowchart:
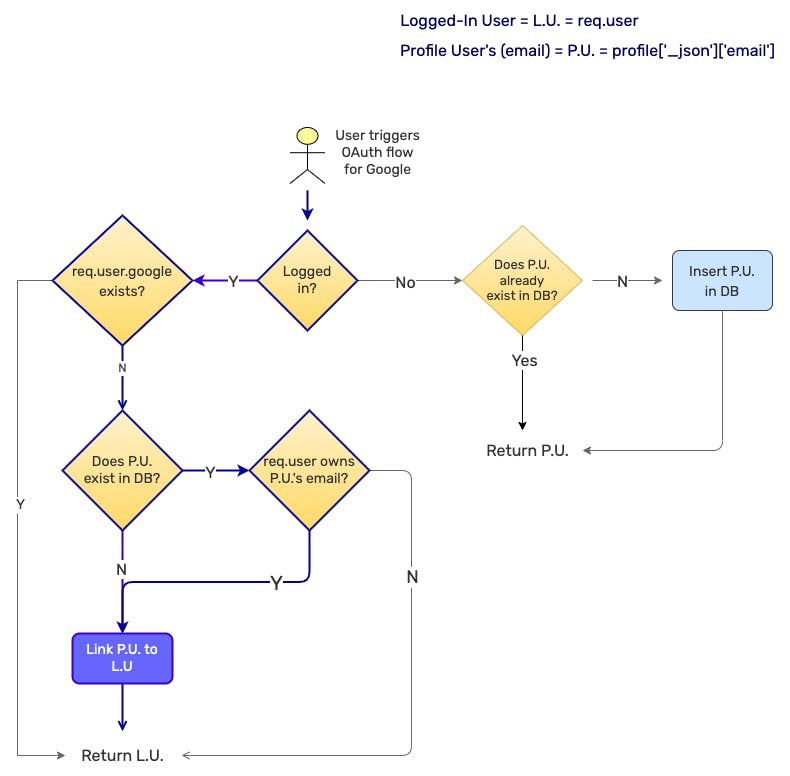
Profile User or (P.U.) simply means the email Id with which the user is trying to log in. The Logged-in user (or L.U.) refers to the currently logged-in user's account.
We have defined a top-level separation in how we handle a logged-in user vs. an anonymous user.
We link the Google account of a user to their logged-in account in only two conditions:
- When the account (specifically the account's email, let's call it ProfileEmail) with which the user is trying to log in does not exist in the database, for any user.
- When the ProfileEmail is already linked to the logged-in user, but for a different provider (since a user can have multiple social accounts with the same email).
In all other scenarios, we either create a brand new user (if not already exist) and treat it as a completely different account (not linked with the Logged-in user or L.U.), or we do nothing.
Our updated Google strategy:
const passport = require('passport');
const GoogleStrategy = require('passport-google-oauth20').Strategy;

const User = require('@models/user');
const config = require('@config');

passport.use(new GoogleStrategy({
  clientID: config.googleClientId,
  clientSecret: config.googleClientSecret,
  callbackURL: config.googleCallbackUrl,
  scope: ['profile', 'email'],
  passReqToCallback: true,
  },
  async function(req, accessToken, refreshToken, profile, done) {
    try {
      const email = profile['_json']['email'];
      if(!email) return done(new Error('Failed to receive email from Google. Please try again :('));

      const user = await User.findOne({
        $or: [
          { 'google.email': email },
          { 'amazon.email': email },
          { 'github.email': email },
        ]
      });

      if (req.user) {
        if (!req.user.google || (!req.user.google.email && !req.user.google.accessToken && !req.user.google.profileId)) {
          /**
           * proceed with provider sync, iff:
           * 1. req.user exists and no google account is currently linked
           * 2. there's no existing account with google login's email
           * 3. google login's email is present in req.user's object for any provider (indicates true ownership)
           */
          if(!user || (user && user._id.toString() === req.user._id.toString())) {
            await User.findOneAndUpdate({ '_id': req.user._id }, { $set: { google: { email: email, profileId: profile.id, accessToken }, connectedSocialAccounts: (req.user.connectedSocialAccounts + 1) }});
            return done(null, req.user);
          }
          // cannot sync google account, other account with google login's email already exists
        }
        return done(null, req.user);
      } else {
        if (user) {
          return done(null, user);
        }
        const newUser = await User.create({
          name: profile.displayName,
          connectedSocialAccount: 1,
          google: {
            accessToken,
            profileId: profile.id,
            email: email
          }
        });
        return done(null, newUser);
      }
    } catch (verifyErr) {
      done(verifyErr);
    }
  }
));

module.exports = passport;
Keeping track of connected providers
We need to keep track of the number of connected providers to every user account to make sure we don't allow disconnecting (or unlinking) a provider if it is the last one.
To achieve this, we had already defined a field in our user schema earlier. It is called connectedSocialAccounts. It is always initialized to a value of 1, as there will be at least one social provider connected at any point in time.
You would have noticed we increment the count of connectedSocialAccounts whenever we connect a new provider. Similarly, we lower it by one for every disconnection.
Showing the status for all providers
We need to show the status of all providers on the UI. But how does the client know about the status of all providers? We request the details from our server.
This is somewhat related to how the client-side code is written but I'll explain how it works. You can refer to the nodejs code here.
- Whenever the user successfully logs in, we fetch the user details from our backend server.
- For connected (or linked) providers, our front-end checks if the user object contains
google,github, andamazon. It shows the option to disconnect for only those providers who are present given that the number of connected providers is more than one. - For disconnected (or yet-to-be-linked) providers, it simply shows the buttons to connect them.
Cross-Sync Achieved 🎉🎉🎉
Way to go!

Noice! You have successfully reached the second checkpoint 🎊.
Take a breath. Admire what you have achieved 📺 🥳.
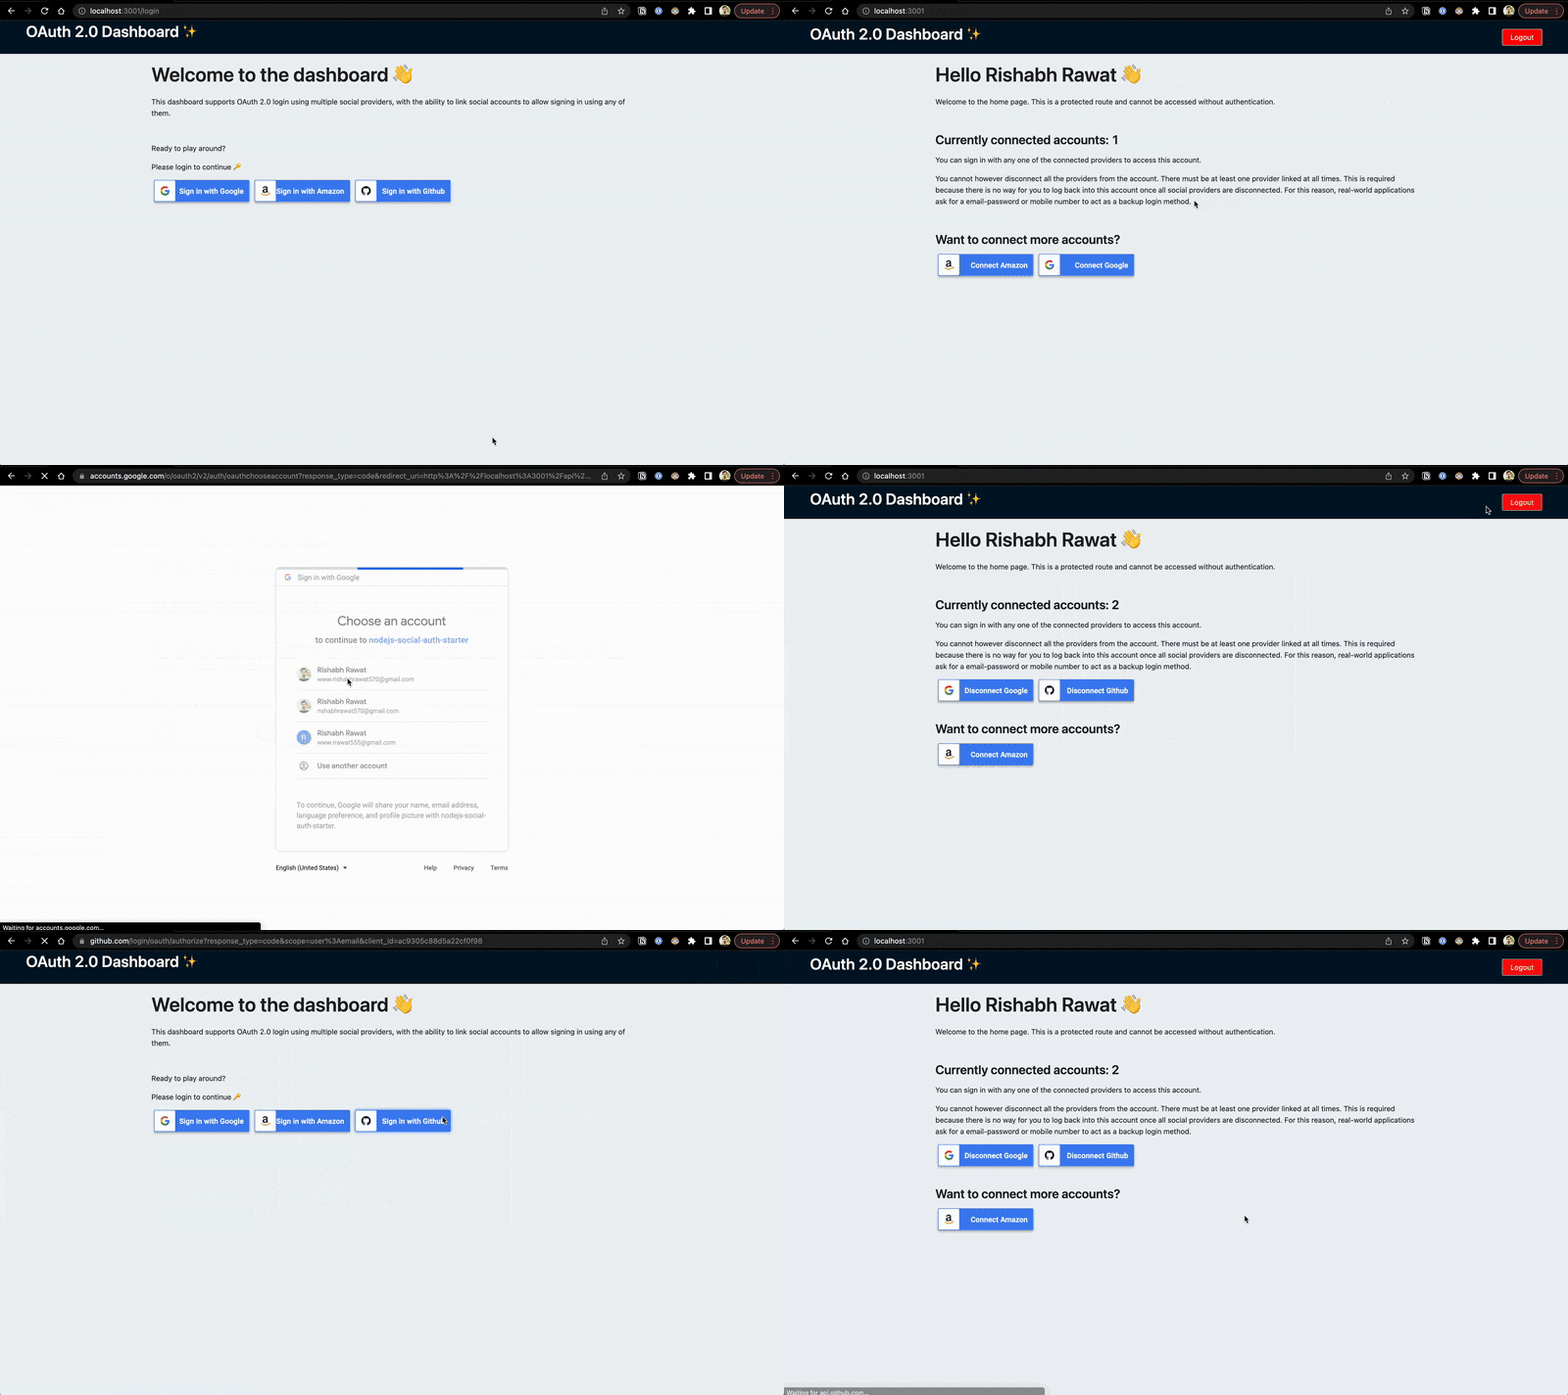
Code up till this point is available in the main branch of the repo. Feel free to take a peek if you’d like.
Now we are heading towards the final stop, i.e., adding the support for multiple logged-in accounts 🚀🎆.
This is not a common feature to have on websites and hence I couldn't any resource covering it.
In the coming section, I'll walk you through my thought process and how I came up with the approach to implement this. And how you can too 🤩.
Here we go 👨🏻💻.
Adding support for multiple logged-in accounts
This feature is very niche and suitable for only specific use cases. You won’t find this in a lot of products. But I wanted to explore how it can be implemented.
Just for context, here’s how it looks for Gmail:
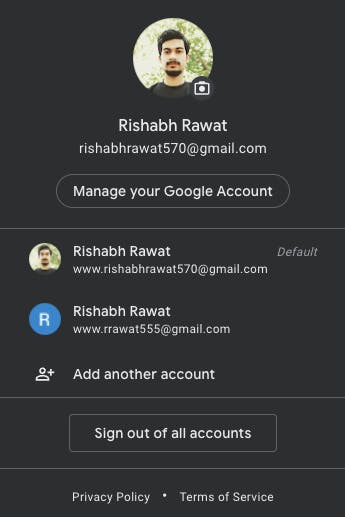
You are most likely familiar with how Gmail works, let me highlight the features we are interested in:
- Clicking any profile loads the data (inbox, labels, filters, settings, etc.) for that account.
- You can sign out of all accounts at once.
- You can log in to multiple Google accounts.
Looking at these requirements, there are a couple of things we can be certain about:
- Gmail indeed loads different user data when you switch between different Google accounts.
- It doesn't ask for your password when you switch accounts. It indicates all the accounts are authenticated. So either Google is storing different sessions for all the user accounts (and loading based on request query param
authuser?) or they are hot reloading a single user session in the backend based on again, request query param. - It allows signing out of all user accounts at once. This would be very straightforward if you have a single session for multiple user accounts.
- It shows a list of currently logged-in Google accounts on the profile popup. This clearly indicates they are storing this information somewhere.
These observations have helped us progress somewhat closer to our goal.
We now have a better understanding of how we can approach this. But there is one decision you need to make before you progress further.
💭 One session per user document or one session per unique user?
Let's understand this with help of an example.
You are an end-user of this application. You have signed in using one of your Google accounts (say G.A1). After signing in, you went ahead and added (not to be confused with connected/linked) another Google account (say G.A2).
- Having one session per user will lead you to have two sessions in the session store (because you technically have two user accounts or two separate MongoDB user documents).
- Having one session per unique user will assign only one session for both of your accounts as both represent the same end-user.
This is a key decision you need to make when implementing this feature as everything else depends on it.
We will be going ahead with the second option i.e., one session per unique user.
Why? Simply because one session is easier to manage. We can hot reload the session when the user wants to switch accounts, and deleting a single session will log all the user accounts out.
This also means that you get logged out from all of your accounts as soon as the session expiry hits.
Tracking all logged-in accounts
When a user is logged in, we need to know what other logged-in accounts that user has, if any. We can store the user Ids of other logged-in accounts in every user document.
Whenever the user adds a new account, we update both user documents (the existing one and the new one that just got added) with the user Id, name, and email of the other one.
We can then extend this for more than two accounts and make sure to update the otherAccounts field in each user document whenever a new Google account gets added.
Now that we have finalized our approach, let's proceed to the next step where we update our Google strategy to support multiple logged-in accounts.
Let's first visualize all possibilities (no, not 14000605 😉):
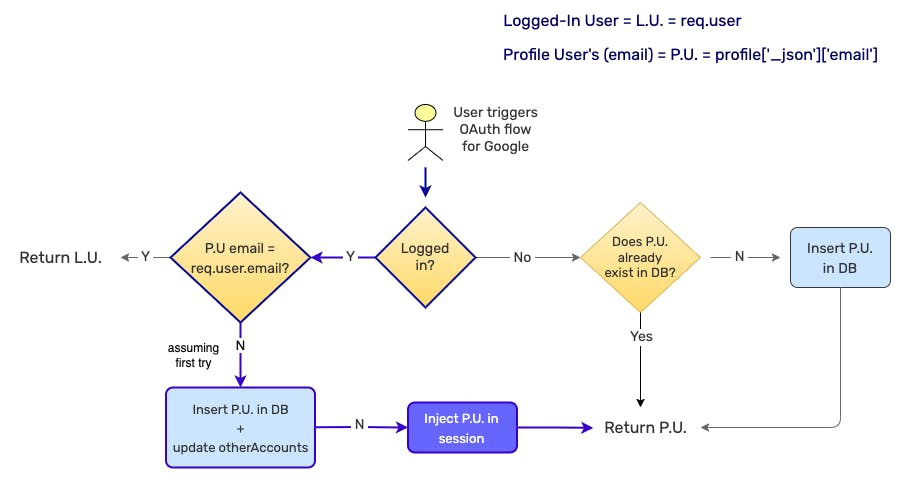
- If the user is not logged in, the user goes through a simple OAuth flow
- However, if the user is logged in, we create a new user document and populate the
otherAccountsflag. Finally, we inject the newly created user's id into the session object (more on this later).
Based on the above considerations, here's our updated passport strategy for Google:
const passport = require('passport');
const GoogleStrategy = require('passport-google-oauth20').Strategy;

const User = require('@models/user');
const config = require('@config');
const { default: mongoose } = require('mongoose');
const mongoSessionStore = require('../../loaders/sessionStore').run();

passport.use(new GoogleStrategy({
  clientID: config.googleClientId,
  clientSecret: config.googleClientSecret,
  callbackURL: config.googleCallbackUrl,
  scope: ['profile', 'email'],
  passReqToCallback: true,
  },
  async function(req, accessToken, refreshToken, profile, done) {
    try {
      const email = profile['_json']['email'];
      if(!email) return done(new Error('Failed to receive email from Google. Please try again :('));

      const user = await User.findOne({ 'email': email });

      if (req.user) {
        if (req.user.email !== email) {
          if (user && req.user.otherAccounts.find((accountObj) => user._id === accountObj.userId)) {
            return done(null, user);
          }
          else {
            // fresh request to add "other logged in account"
            // step 1
            const newUser = await User.create({
              name: profile.displayName,
              email,
              profileId: profile.id,
              accessToken,
              otherAccounts: [ ...req.user.otherAccounts, { userId: req.user._id, name: req.user.name, email: req.user.email } ],
            });


            // step 2: update otherAccounts for already logged in users
            req.user.otherAccounts.forEach(async (otherAccount) => {
              await User.findOneAndUpdate({ '_id': otherAccount.userId }, { $push: { otherAccounts: { userId: newUser._id, email: newUser.email, name: newUser.name } } });
            });

            // step 3: : update otherAccounts for logged in user
            const existingUser = await User.findOne({ '_id': req.user._id });
            existingUser.otherAccounts.push({ userId: newUser._id, email: newUser.email, name: newUser.name });
            await existingUser.save();

            // update session in mongo
            mongoSessionStore.get(req.sessionID, (err, currentSession) => {
              currentSession.passport.user = new mongoose.Types.ObjectId(newUser._id);
              mongoSessionStore.set(req.sessionID, currentSession, (updateErr, finalRes) => {
                // return the new user
                return done(null, newUser);
              });
            });
          }
        } else {
          return done(null, req.user);
        }
      } else {
        if (user) {
          return done(null, user);
        }
        const newUser = await User.create({
          name: profile.displayName,
          email,
          accessToken,
          profileId: profile.id,
          otherAccounts: [],
        });
        return done(null, newUser);
      }
    } catch (verifyErr) {
      done(verifyErr);
    }
  }
));

module.exports = passport;
We have successfully updated our Google strategy and made sure each user document contains the references to the other logged-in accounts 👌🏻.
Switching between different logged-in accounts
This looks very similar to how Gmail provides the option to switch accounts. We have a profile popup that shows all the logged-in accounts and clicking on anyone loads that user account into session.
But how do we hot reload the session?
We are using MongoDB as our session store with the help of connect-mongo npm package. This allows saving the session in the same database we are storing the application data.

Let's check out what a session collection holds:
[
  {
    _id: 'PcFbwsKJQsFHNtH5TksWbCMmuDC7odjH',
    expires: ISODate("2022-05-12T12:31:36.554Z"),
    session: {
      cookie: {
        originalMaxAge: 120000,
        expires: ISODate("2022-05-12T12:31:35.530Z"),
        secure: null,
        httpOnly: false,
        domain: null,
        path: '/',
        sameSite: null
      },
      passport: { user: ObjectId("627b5024419f6964528642b3") }
    }
  }
]
Let's look closely at the passport object in the session. It only contains the user Id (since we only pass the user Id to the callback during passport.serialize).
This gives us conclusive proof that Passportjs takes this user Id and runs the passport.deserialize to load the user into the session.
This also means that we only need to somehow replace this user Id if we want to hot reload a user into the session (without going through the whole authentication flow again).
Fortunately, connect-mongo has a concept of events. We can leverage the setter method it provides to update the session whenever we need.
But doesn't this mean that we can (mistakenly) inject a user Id into the session for a completely different user? Doesn't this pose a security risk?
Yes, it has the potential. That's why we have introduced the concept of otherAccounts in the user schema.
⭐️ Users can switch to another logged-in account only if the user Id of the second account is present in the otherAccounts array of the first one.
We enforce this in the account switch route:
router.get('/google/switch/:userId', ensureAuthenticated, async (req, res) => {
  const { userId } = req.params;
  const currentSessionId = req.sessionID;
  const newUserId = new mongoose.Types.ObjectId(userId);

  if (req.user.otherAccounts && !req.user.otherAccounts.find((otherAcc => otherAcc.userId === userId))) {
    // not authorized to switch
    return res.redirect('/');
  }

  mongoSessionStore.get(currentSessionId, (err, sessionObj) => {
    if (err) {
      res.redirect('/');
    }
    else {
      sessionObj.passport.user = newUserId;
      mongoSessionStore.set(currentSessionId, sessionObj, (updateErr, finalRes) => {
        if(updateErr) {
          console.log('error occurred while updating session');
        }
        res.redirect('/');
      });
    }
  });
});
- This is a protected route so an anonymous user can't even access this.
- We are checking if the
otherAccountsarray contains the user Id that the logged-in user is trying to switch to.
Combining these practices, we have made it much more secure for the users 🔐.
🎉 We have completed the final step 🎉
With the third and final checkpoint, you have completely built the fully functional OAuth 2 authentication & authorization mechanism with the ability to add multiple logged-in accounts.

You can find the complete code for this checkpoint here ✨.
📺 Final walkthrough of the application:
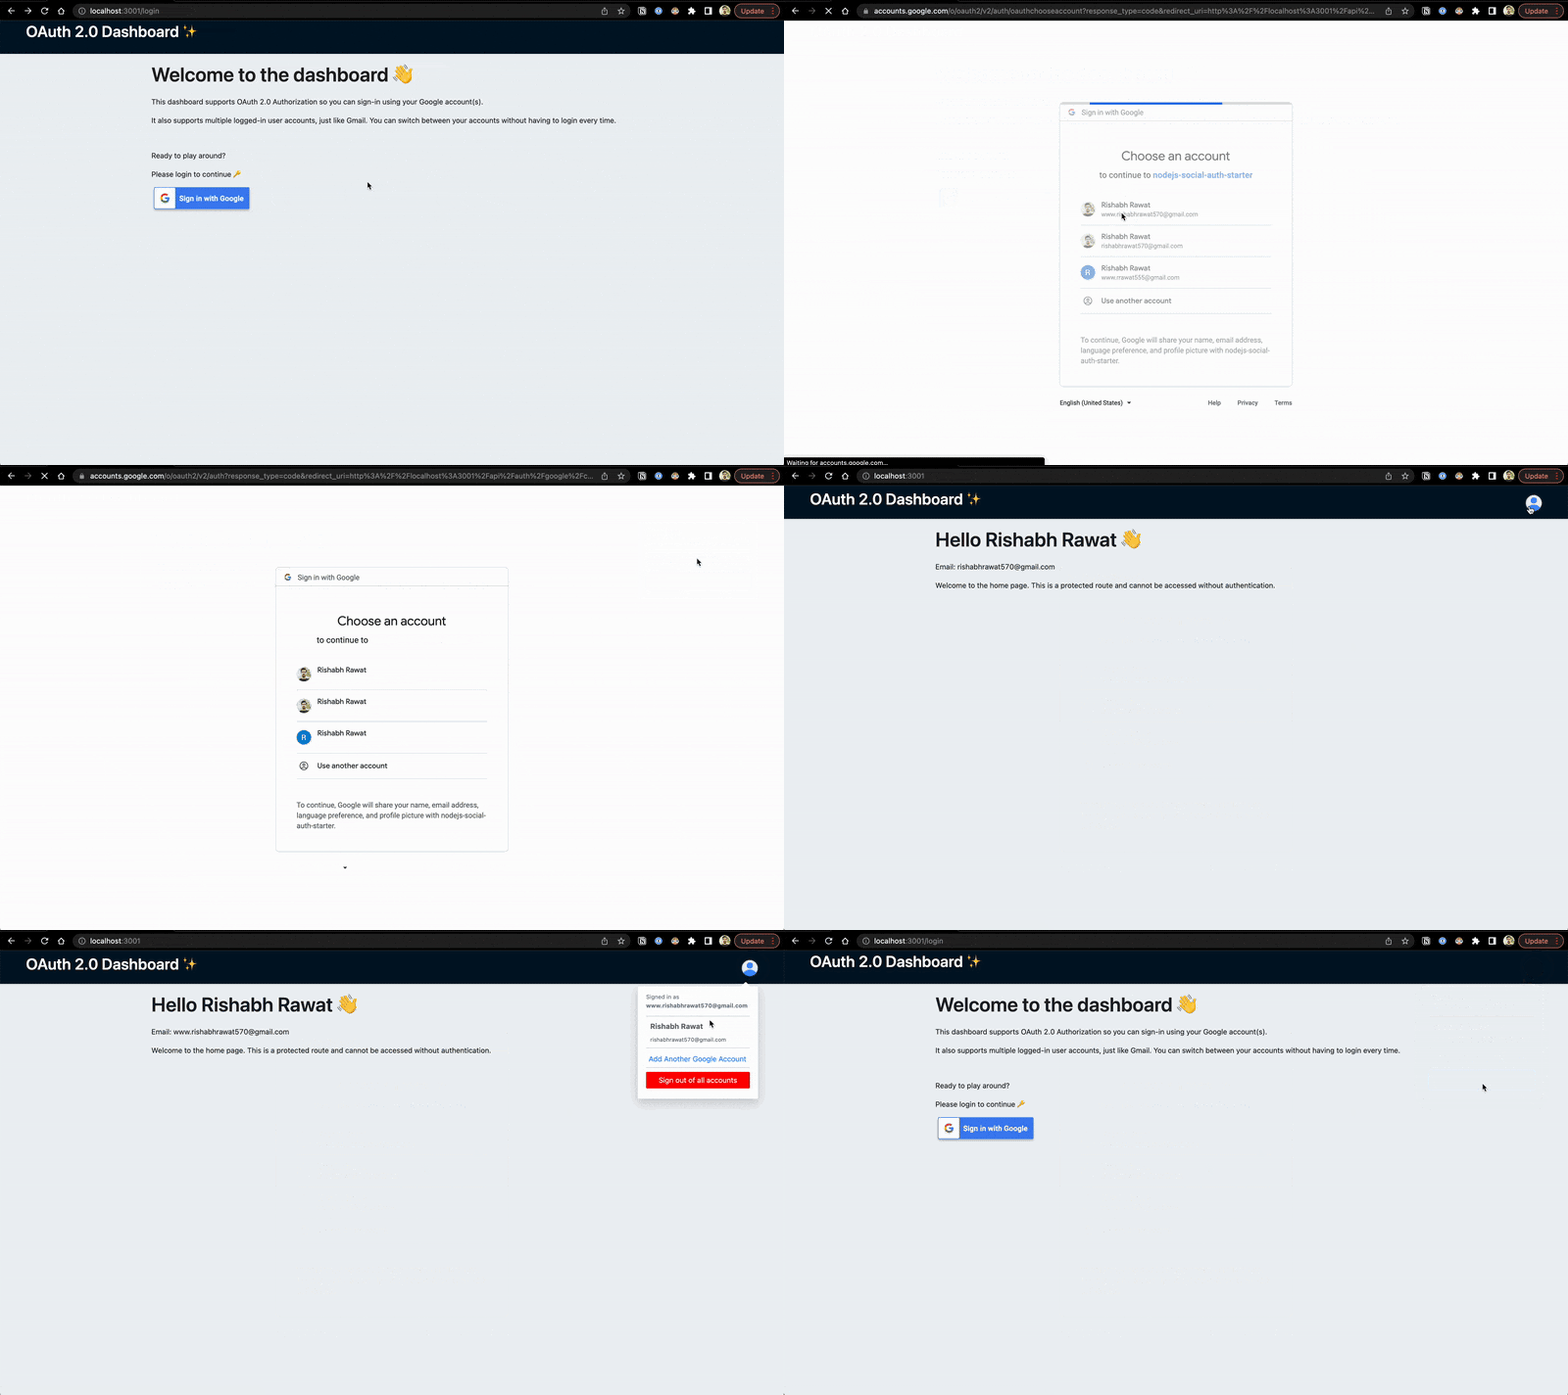
You are a rockstar programmer and definitely believe in patience! This is no easy feat.
I tried my best to make sure this guide is light to read, skimmable, and to the point.
You can choose to walk away from your screen for a while, have a glass of water, and take a break.
You have earned it 🚀.
Conclusion
And that's it! We have covered a lot of ground in this article. We talked about how we can implement OAuth authentication using Passportjs in an Expressjs application with multiple social providers and the ability to sync multiple social accounts to a single user account. Additionally, we also looked that how we can have multiple user accounts logged in at the same time.
The main reason I jotted this down is that I couldn't find any resource explaining the things covered in this article. And, building this project will definitely come in handy next time I (and certainly you) need an OAuth2 boilerplate. What's better than having a headstart on your next awesome project 😄.
I hope it helped you implement OAuth 2 authentication without any major issues. If you feel there is something missing or can be better explained, please feel free to drop a comment below. This will help everyone who lands on this article.
I would also love to know your experience with OAuth 2. For me, it was an if-it-works-don’t-touch-it thing, but now I definitely have a better understanding of what goes on behind the scenes.
Happy authenticating 🔐.
What next?
There are a lot of things that you can explore. If social authentication using OAuth 2 is the first authentication & authorization mechanism you are learning, you can check out other types of strategies out there.
Two-Factor Authentication (2FA) and Single Sign-On (SSO) are the two things I would love to learn next in the authentication realm.
Security through obscurity is also fascinating, you can take a peek and decide if you want to explore it further.
And just a final reminder, there is never a perfect plan to learn things. It's okay to learn (& break) things that you find intriguing and connect the dots along the way. I found this article really helpful on the topic.
Resources
In addition to all the resources mentioned in this guide, you can check out the following resources to further deepen your understanding and expand your horizons:
